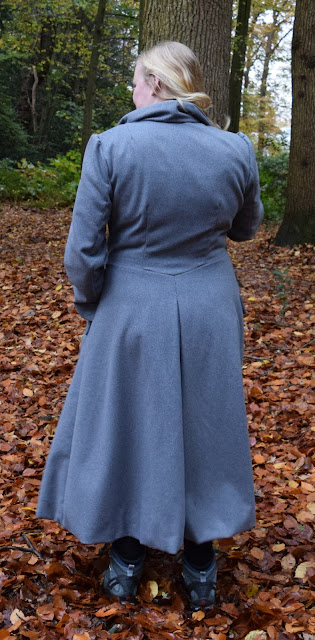
Pattern review: Vogue 1669: vintage coat - grey version
This is my third Vogue 1669, a grey version for my sister. I'm really glad I've finished it though, because the fabric had been in my stash for a while now. I was a little bit apprehensive, the sew itself it not very long or difficult, but the hem is handstitched and not something I really looked forward to. Perhaps next time I will just machine sew it. It will show on the outside, but handsewing three of these hems was enough.
The pattern
Lined coat has fitted bodice, side front pockets with flaps, two-piece
sleeve with slit and center back pleat. View A-Contrast bodice facing
and upper collar. Views A, B-Optional bound buttonholes. Sew Rating:
Advanced
Re-issue of Vogue Couturier Design 490 from 1949.
Re-issue of Vogue Couturier Design 490 from 1949.
Additional info:
- US 6-14 or US 14-22.
- Recommended fabrics: flannel, tweed or lightweight woolens
- Rated advance
- envelope pattern with multiple sizes
The fabric
- Wool, polyester and recycled wool combination. It has a great shine to it and lights up in the sun. Weight is 380 g/m² (11.2 oz.yd2). Of budgetstoffen.nl. Site is in Dutch and German.
- Fancy satin lining called 'Birds of paradise satin'. Textielstad.
Wool: 4m for €8,00/m
Lining: 3 m for €5,00/m.
Pattern instructions
The instructions are very elaborate and I think anybody can do it,
if you read carefully and take each step one at a time. If you plan on
making one: here is a list of tips for the steps I thought might be
helpful.
Don't forget to keep two pieces of 2" bias squares of main fabric for reinforcement.
Seembinding is optional.
Step 4, it asks for a part ease stitching. I don't know why and I omitted it.
Step 5, I somehow got stuck where it makes the back pleat. The first 2 inches are sewn together, mine isn't. It is not that difficult, I just could not figure it out after sewing the bodice to the skirt and saw it was different from the picture.
Step 7. Add part 13 first if chosen (bound button holes). It is easier to make the button holes in a piece of fabric instead of later on when the whole outside coat is finished.
Step 11, make sure the pocket is all the way up to the reinforcing stitch as the pocket is supposed to be in the corner of the stitches.
Step 14, under stitching pocket is very necessary, but it will be through 4 layers of fabric which was to much for my sewing machine so it looks a bit bulkier.
Step 41, Oh look, wrong side is showing, why is my piece right side up? Because 5 out of 7 fabric lay-outs are wrong.
Step 42, make a welt-like pocket out of button-holes is not doable with thicker fabric.
Step 58, My machine did not want to understitch facings and coat (since 4 layers of fabric). I sewed the facing to the seam allowances (3 layers of fabric) and pressed well.
Fit
It fits perfectly and the sizing chart is on point. I love the silhouette of the coat. It is long and amazing. The pockets and the lapels really stand out and make the coat.
Conclusion
After three versions, I've had enough of it for a while, but I still really like the pattern. If my coat will wear down I will make a new version of it. It's not e very difficult sew, you just have to be careful in reading all the steps. What do you think
Have you tried this pattern, need any encouragement. Let me know, I got your back.


I know this is an old post but I am making this coat and there is a part of the instructions that just baffles me and I'm using wool too. Step 70. Is it talking about the facing as the whole piece? Or just the interfacing extra?
ReplyDeleteAlso when I went to slip stitch in the liner it isn't long enough to go around the bottom of the coat, not sure where I messed up
Thanks,
Randi