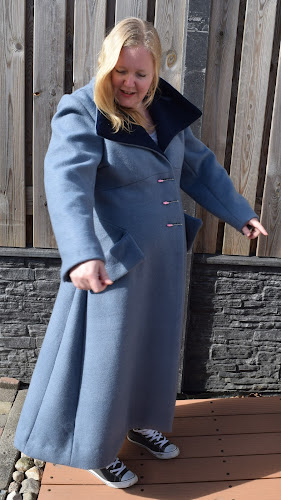
Pattern review: Vogue 1669: vintage coat
The pattern
Lined coat has fitted bodice, side front pockets with flaps, two-piece
sleeve with slit and center back pleat. View A-Contrast bodice facing
and upper collar. Views A, B-Optional bound buttonholes. Sew Rating:
AdvancedRe-issue of Vogue Couturier Design 490 from 1949.
Additional info:
- US 6-14 or US 14-22.
- Recommended fabrics: flannel, tweed or lightweight woolens
- Rated advance
- envelope pattern with multiple sizes
The fabric
- Wool-look polyester, but the description does not do it justice. It looks really beautiful. I used faded blue for the outside and night blue for the contrasting collar. Weight is 420 g/m² (17,72 oz.yd2)
Pattern instructions
The instructions are very elaborate and I think anybody can do it, if you read carefully and take each step one at a time. If you plan on making one: here is a list of tips for the steps I thought might be helpful.Don't forget to keep two pieces of 2" bias squares of main fabric for reinforcement.
Seembinding is optional.
Step 4, it asks for a part ease stitching. I don't know why and I omitted it.
Step 5, I somehow got stuck where it makes the back pleat. The first 2 inches are sewn together, mine isn't. It is not that difficult, I just could not figure it out after sewing the bodice to the skirt and saw it was different from the picture.
Step 7. Add part 13 first if chosen (bound button holes). It is easier to make the button holes in a piece of fabric instead of later on when the whole outside coat is finished.
Step 11, make sure the pocket is all the way up to the reinforcing stitch as the pocket is supposed to be in the corner of the stitches.
Step 14, under stitching pocket is very necessary, but it will be through 4 layers of fabric which was to much for my sewing machine so it looks a bit bulkier.
Step 41, Oh look, wrong side is showing, why is my piece right side up? Because 5 out of 7 fabric lay-outs are wrong.
Step 42, make a welt-like pocket out of button-holes is not doable with thicker fabric.
Step 58, My machine did not want to understitch facings and coat (since 4 layers of fabric). I sewed the facing to the seam allowances (3 layers of fabric) and pressed well.
Fit
It fits perfectly and the sizing chart is on point. I love the silhouette of the coat. It is long and amazing. The pockets and the lapels really stand out and make the coat. Conclusion
I can't wait for coming winter. I will be stylish and comfortable. If I sew quick enough, my mom in law and my sister will have their versions as well. If you have a copy, don't be shy to try it out. If I can do it, you definitely can. I had sewn one (kids) coat before and was able to pull it of.
What do you think
Have you tried this pattern, need any encouragement. Let me know, I got your back. 


Comments
Post a Comment